Model-specific replacement guide · Source-reported information
Gigabyte Aorus GTX 1080 Ti Thermal Pad Replacement Guide: Thickness and Dimensions
Thickness notes from community sources for the Gigabyte Aorus GTX 1080 Ti. Structured cut sizes are still being verified.
Structured cut sizes for this guide are still being reviewed. The instructions below reflect source-reported information; sheet sizes mentioned in the article are not the same as verified cut-piece quantities.
Card identity & compatibility
Gigabyte Aorus GeForce GTX 1080 Ti · Part number not recorded · PCB revision: Unknown · Aorus air cooler
Documented for the Gigabyte Aorus GTX 1080 Ti layout. Other GTX 1080 Ti cooler designs differ.
Introduction
The Gigabyte Aorus GTX 1080 Ti is a powerhouse in the realm of graphics cards, offering exceptional performance for gaming and professional applications. However, to maintain this high level of performance, effective heat management is crucial. Over time, thermal pads can degrade, reducing their ability to transfer heat away from critical components. This guide provides detailed instructions for replacing the thermal pads on your Gigabyte Aorus GTX 1080 Ti, focusing on the correct thicknesses and dimensions to ensure optimal thermal performance.
Importance of Thermal Pad Replacement
Thermal pads serve as a bridge for heat transfer between the GPU, VRAM, VRMs, and the heatsink. Selecting the appropriate thermal pads and replacing them periodically can prevent overheating, extend the lifespan of your graphics card, and maintain its performance.
Recommended Thickness and Dimensions
When replacing thermal pads on the Gigabyte Aorus GTX 1080 Ti, it’s crucial to use the correct thicknesses to ensure efficient heat transfer and avoid physical damage to the card.
- RAM Modules: Use 2mm thick pads. Some areas on the coldplate have markings to guide the size; otherwise, use the old pad as a reference for dimensions.
- Standard Shape Areas Near the GPU: A 2mm thickness is also suitable here.
- Lower Portion of the Heatsink: In areas with a raised portion separating them, 1.5mm pads are recommended. Initially, 1mm may seem sufficient, but 1.5mm ensures proper contact.
- Towards the End of the Card: For sections requiring more substantial contact, 3mm thick pads are advisable to ensure full coverage and efficient heat transfer.
- Backplate Areas: The copper chunk touching the backplate and the large pad with a U-shaped notch should have 3mm pads, while other areas on the backplate can utilize 2mm thick pads.
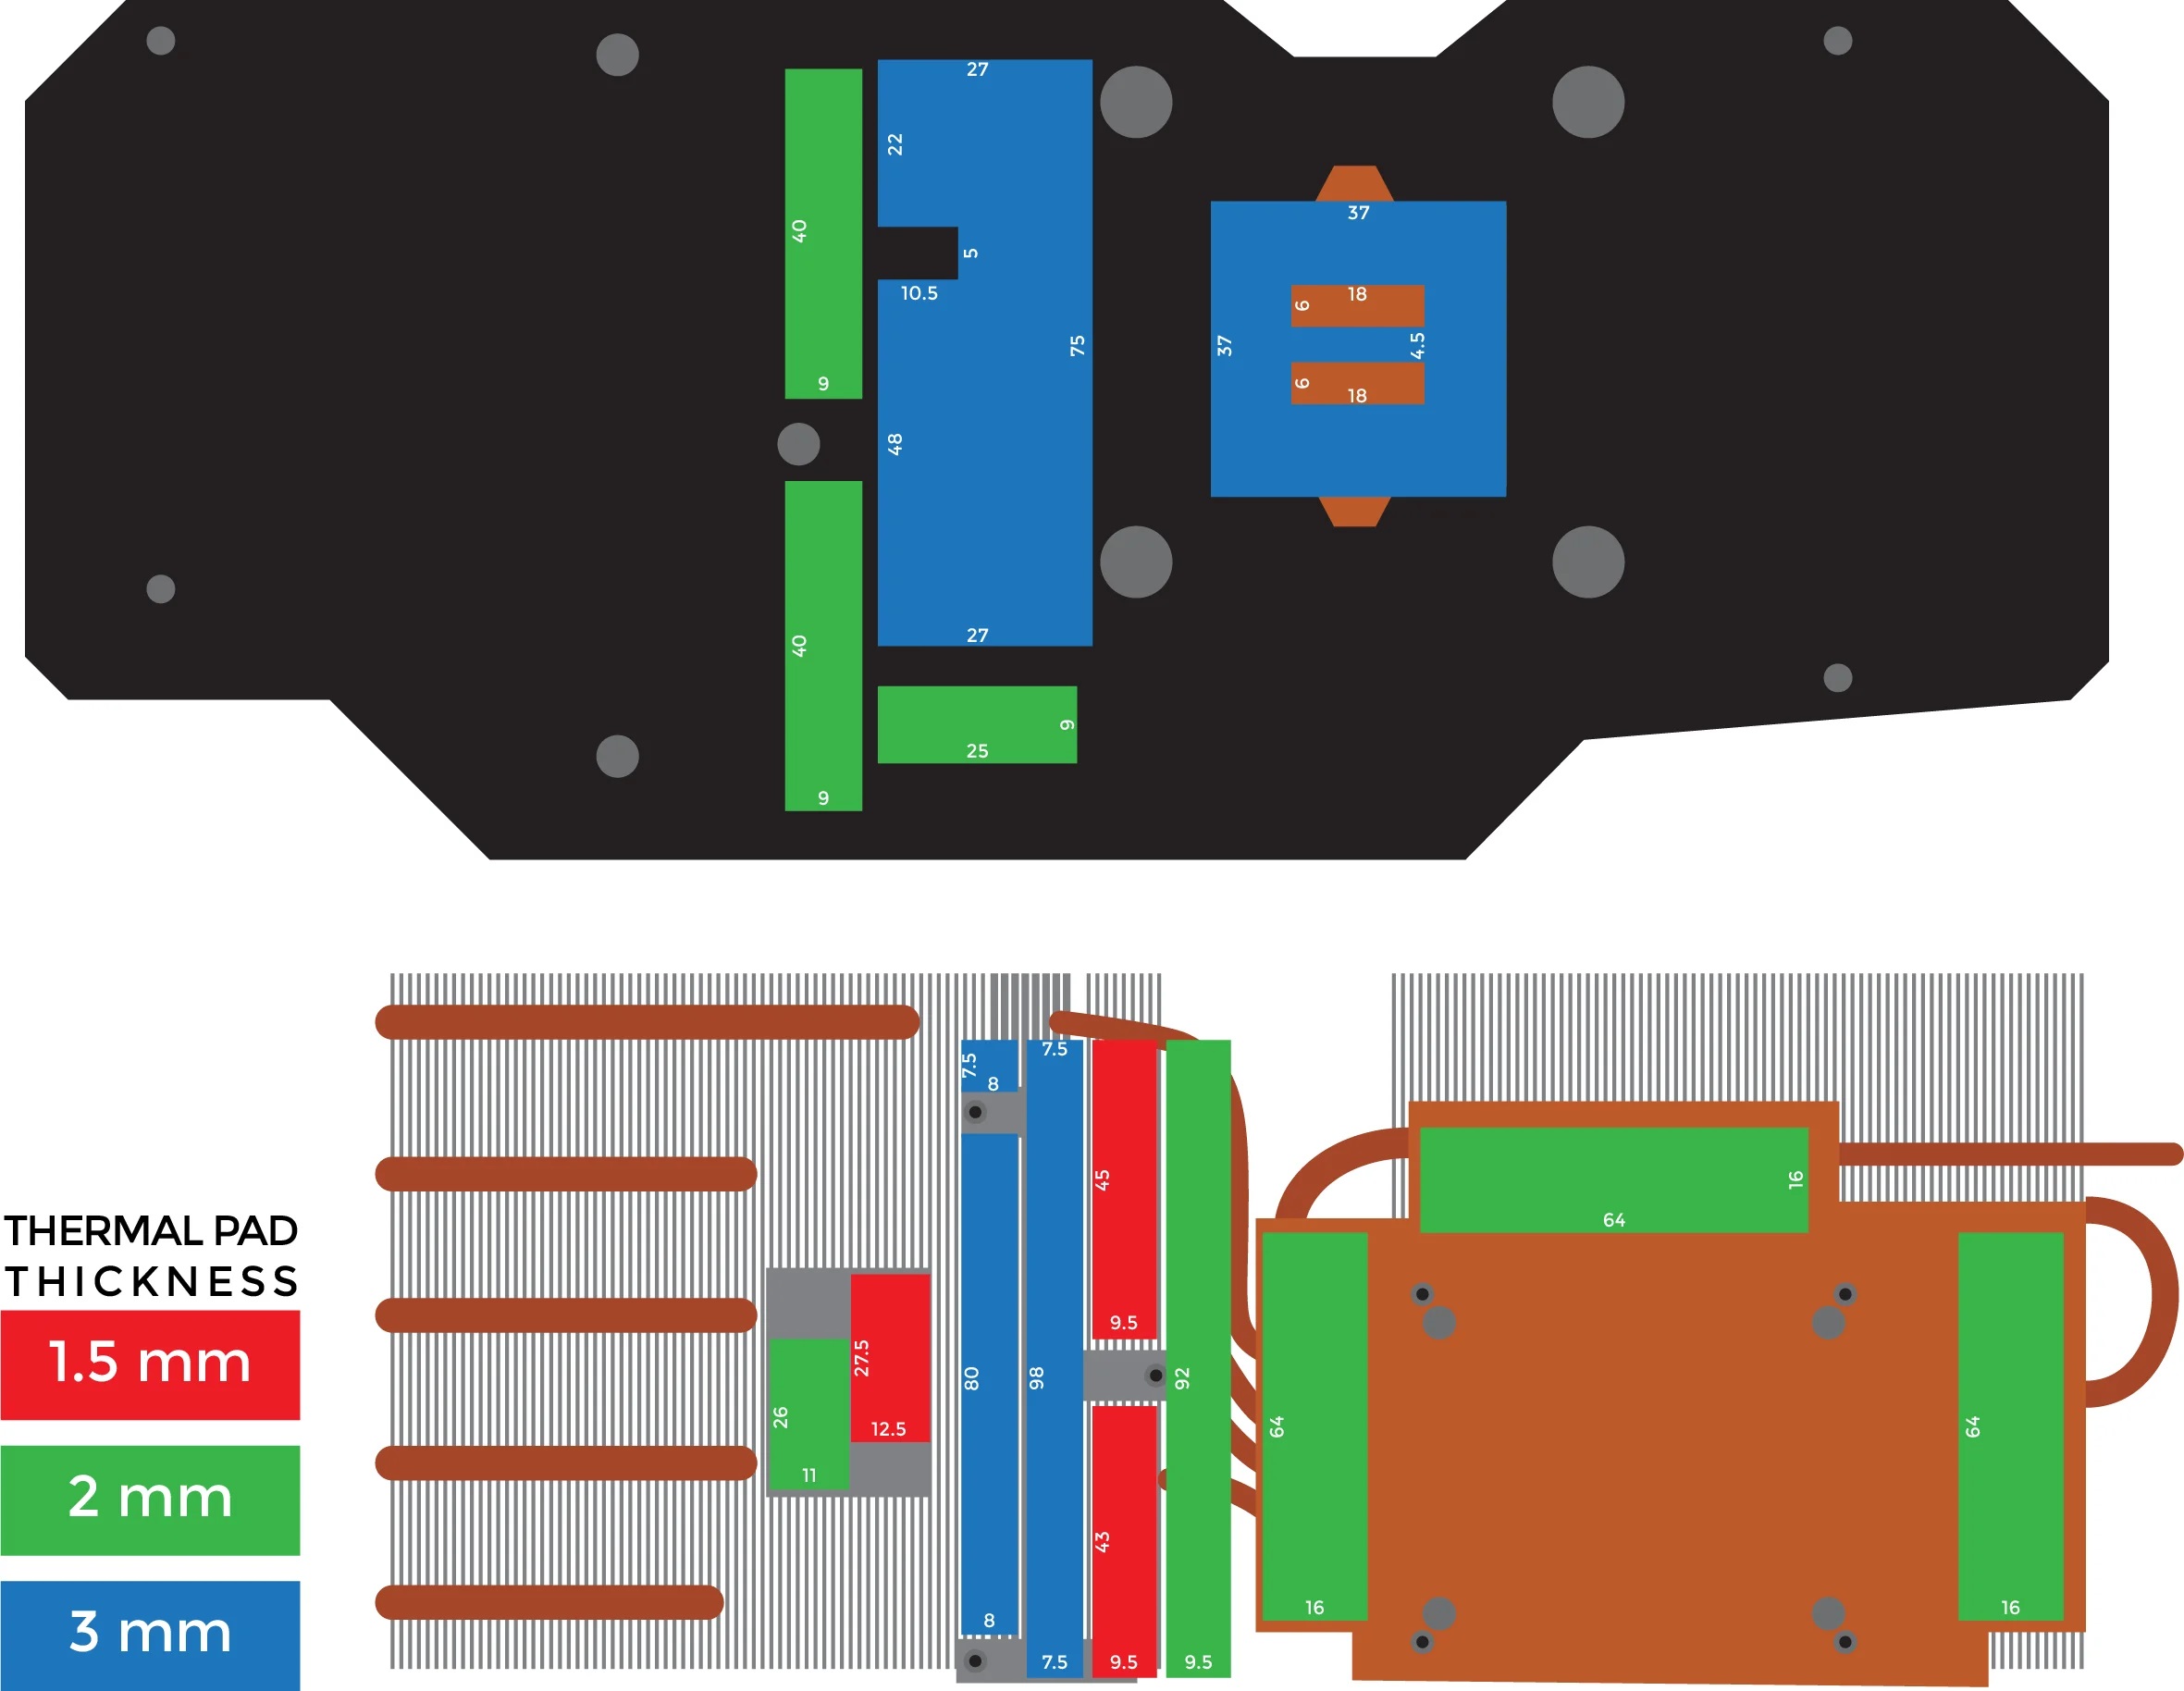 Photo by: https://www.reddit.com/user/TheSparksters/
Assembly Tips
- Even Pressure: When reassembling the card, apply pressure evenly and slowly. This ensures that the thermal pads are properly compressed without damaging any components.
- Die Coverage: Fully cover the GPU die with thermal paste (non-conductive) to ensure optimal heat transfer. Excess paste will squeeze out but won’t cause issues since it’s not electrically conductive.
- Plastic Sheets: Leave any manufacturer-applied plastic sheets in place on the backplate to prevent potential electrical shorts.
Temperature and Overclocking Performance
Replacing thermal pads can significantly impact the card’s thermal performance and overclocking potential. With new pads and proper thermal paste application:
- Temperature Reduction: Tests show a noticeable decrease in GPU die temperature, from mid-50s °C to 47-48 °C without overclocking, under the same ambient conditions.
- Overclocking Headroom: While core clock improvements may be modest, memory clock enhancements are more substantial, illustrating the effectiveness of the thermal management upgrade.
Conclusion
Maintaining your Gigabyte Aorus GTX 1080 Ti with timely thermal pad replacements is key to ensuring longevity and peak performance. By selecting the correct pad thicknesses and following precise replacement procedures, you can significantly enhance heat dissipation, reduce temperatures, and potentially improve overclocking results. This guide aims to equip you with the knowledge to perform this maintenance task confidently, ensuring your graphics card continues to operate at its best.
Replacement process
Step-by-step instructions
Follow the illustrated instructions in this guide. Structured step records can be added as evidence is reviewed.
Sources & evidence
- Community teardown notes (Gigabyte Aorus GTX 1080 Ti) ↗ Photo attribution: TheSparksters / Reddit
Discussion